Set Up
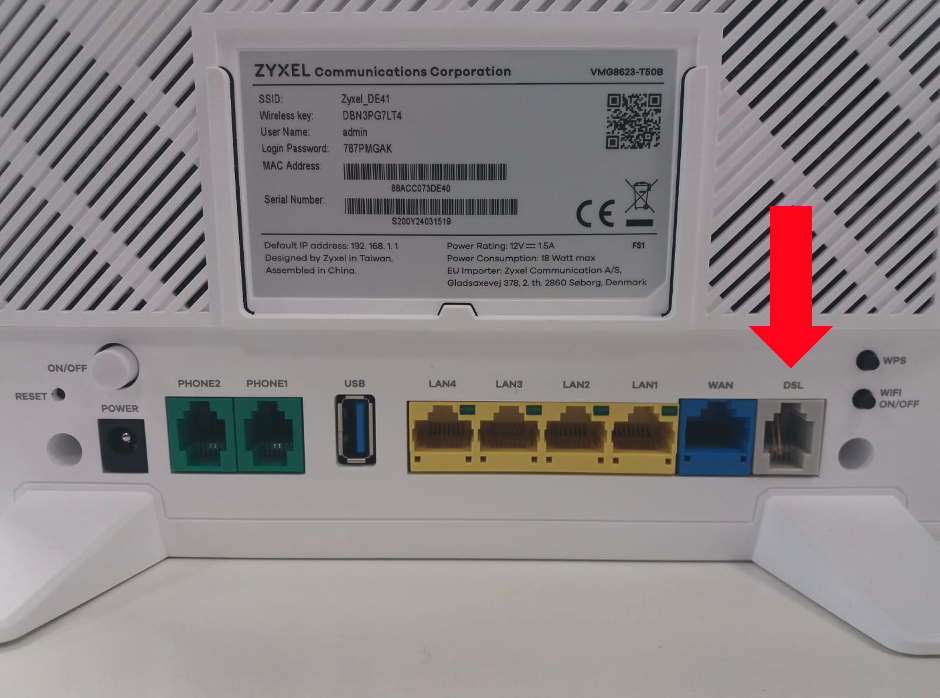
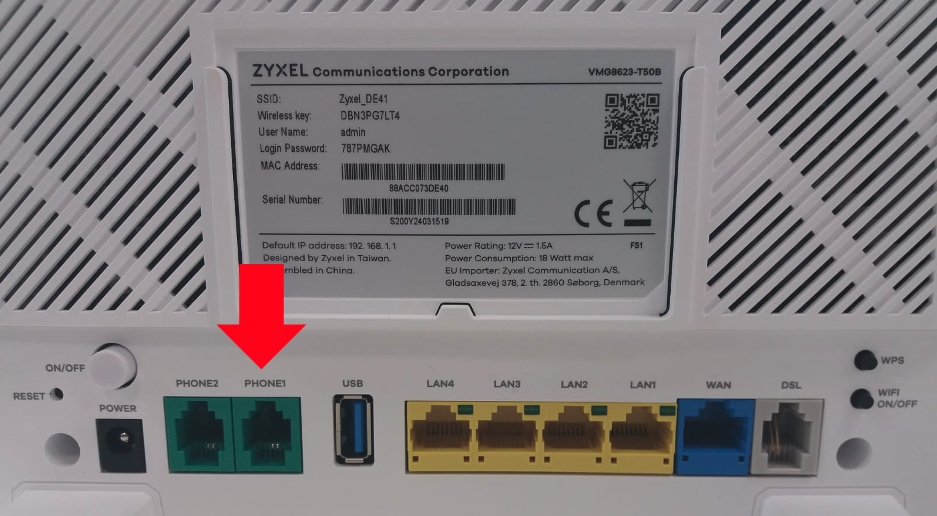
For ADSL/Fibre to the Cabinet - the grey DSL cable needs to be plugged into the grey DSL port located on the back of the modem and the left side of the NTU (Phone socket, computer symbol side).
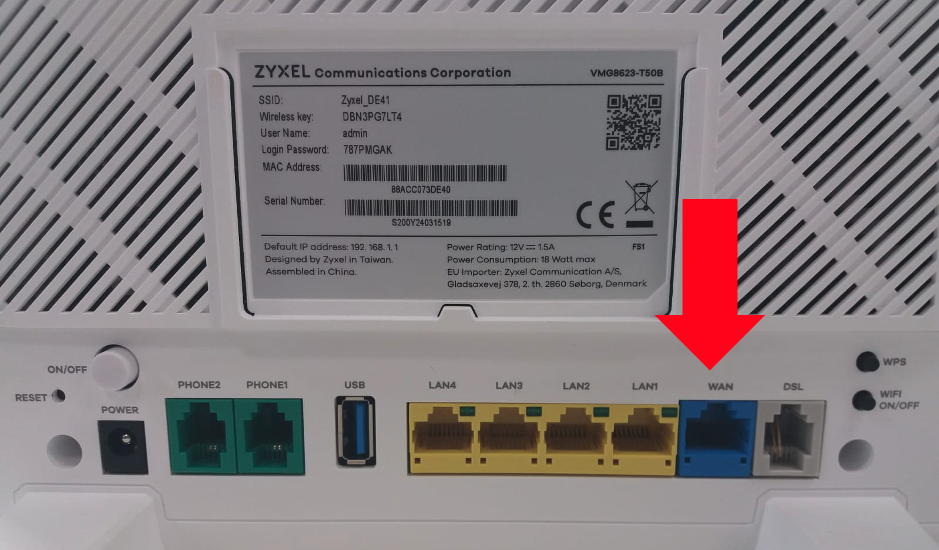
For Fibre to the Home/SIRO - The LAN cable needs to be plugged into the blue WAN port.
For VOIP, the phone needs to be plugged into the green PHONE1 port (this will not work in PHONE2).
For Fibre to the Home /SIRO connections:
- You should have 3 green lights on your fibre/SIRO unit.
- POWER: Constant green PON: Constant green LAN: constant/flashing green.
- If you have a flashing/no PON light or a flashing/constant RED LOS light contact support on 01 2469000
option 2.
You will know you have an internet connection when the power light is constant on the modem, the link light (2 arrows) is constant, the internet light (globe) is constant/flashing and wireless lights (2.4ghz and 5ghz) is flashing/constant. If you have followed the above steps but these lights still are not appearing on the modem, then please contact our support team on 01 2469000 and press option 2. Our support team can also be reached via e-mail at [email protected]
The steps you will need to take to connect to your WiFi will depend both on the device and the operating system (i.e. Windows &, 10 MacOS etc.) you are using. See below for further instructions:
Mac OSX
- Find your network name and wireless key on the sticker on back of the modem or on the card provided with the modem
- Click on the airport (WiFi) icon at the top right of your desktop screen.
- Find and select your network name.
- Enter your wireless key password.
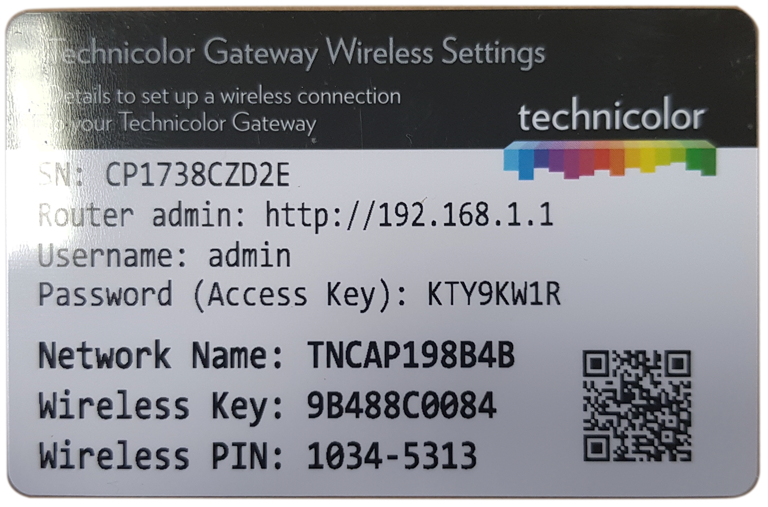
Wireless Card and Sticker on the back of the modem with your network details;
Windows 7
- Find your network name and wireless key on the sticker on back of the modem.
- A yellow sign covering your WiFi icon indicates that you are not connected. Click on this.
- Find and select your network name.
- Click ‘connect’ and enter your wireless key.
Windows 8
- Find your network name and wireless key on the sticker on back of the modem.
- A red sign or a red ‘x’ will be covering your WiFi icon if you are not connected.
- Move your courser to the far right to activate menu options and select ‘settings’.
- Click on your WiFi icon.
- Find and select your network name.
- Click ‘connect’ and enter your wireless key when prompted.
Android Phone/Tablet, Apple iPhone/iPad, Windows Phone:
- Tap on ‘settings’.
- Choose the WiFi option and make sure it is turned on.
- Find and select your network name.
- Enter your wireless key when prompted.
- Make sure that CAPS LOCK isnot selected. If you have a character that looks like a capital ‘O’ with a line through it, then it’s the numeric value for zero.
- Change accordingly and re-enter.
- Failing this, you may need to contact our team on 01-2469000.
For the all black Technicolor modem model TG588v v2, follow these steps:
- Open a fresh browser page;
- Go to the URL bar at the top of the webpage and enter the following IP address –
192.168.1.1. This will bring you to the modem login page:
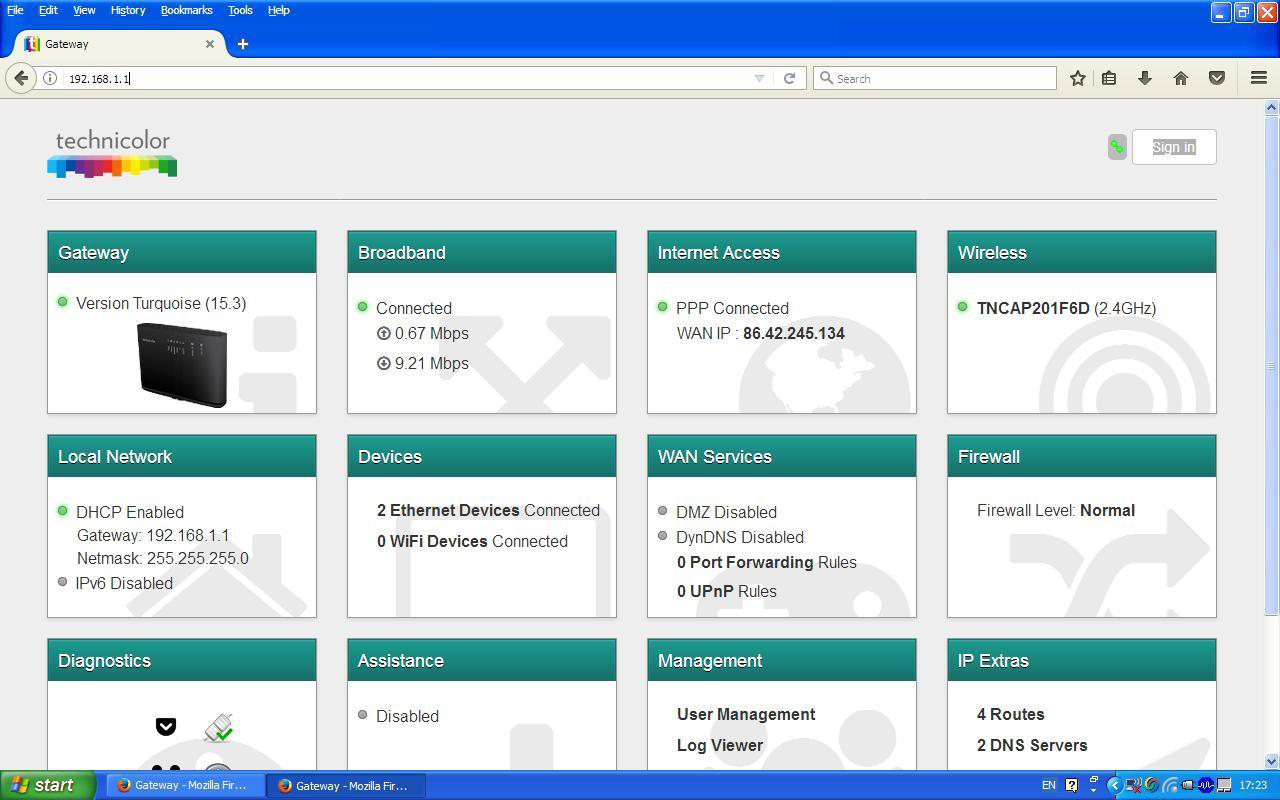
TG588v v2 Landing Page:
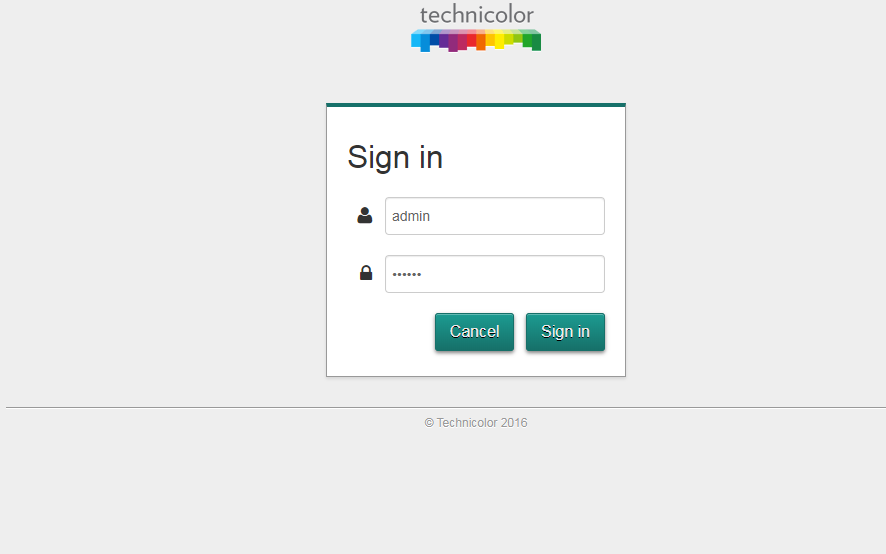
- Click on ‘sign in’ and an admin pop-up box will appear. It will prompt you to enter a username and password. The default username and password should be ‘admin’ for both;
- Once you are signed into the modem, click on ‘wireless’. This will bring up the wireless settings;
- Scroll down until you see ‘wireless password’. This is where you can change your password;
- Once you have entered in the relevant details, click save;
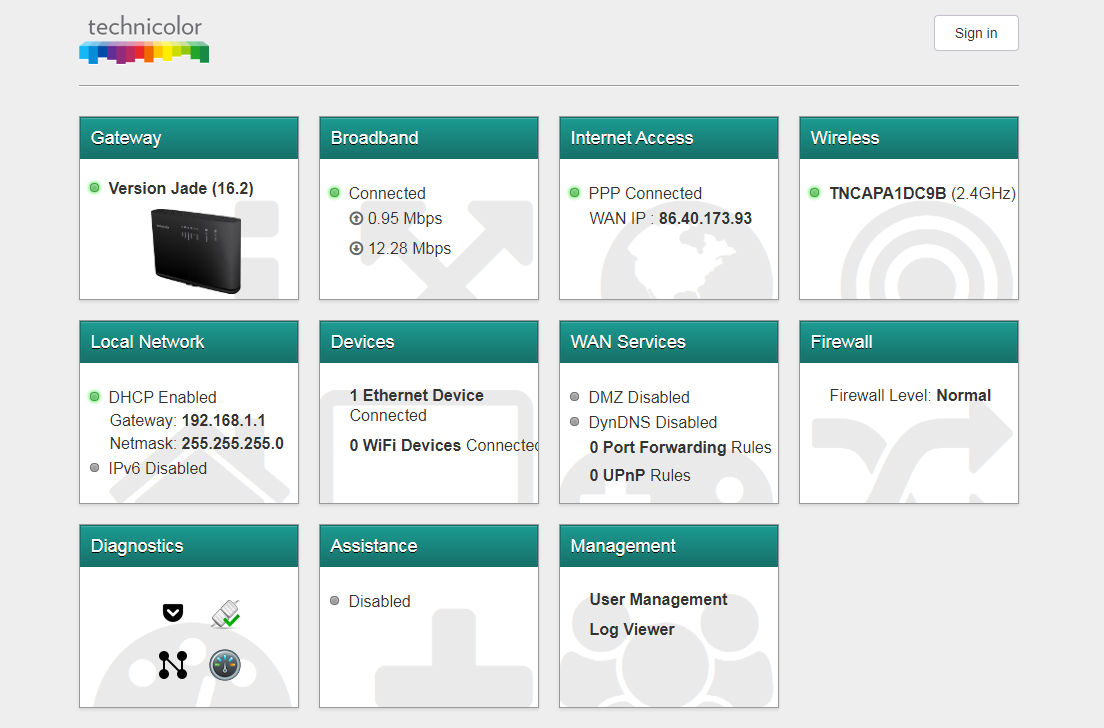
Note: You will have to enter your new wireless password onto every device that uses your WiFi. For the all-white Technicolor Fibre To The Home modem model TG589vac v2, follow these steps:
- Open a fresh browser page;
- Go to the URL bar at the top of the webpage and enter the following IP address – 192.168.1.1. This will bring you to the modem landing page;
- Click on ‘sign in’ and an admin pop-up box will appear. It will prompt you to enter a username and password;
- Sign into the modem. The default username should be ‘admin’ and the password is the
ACCESS KEY located on the sticker on the bottom of the modem or on the card
that
came with the modem.
TG589vac v2 Fibre to the home network details:
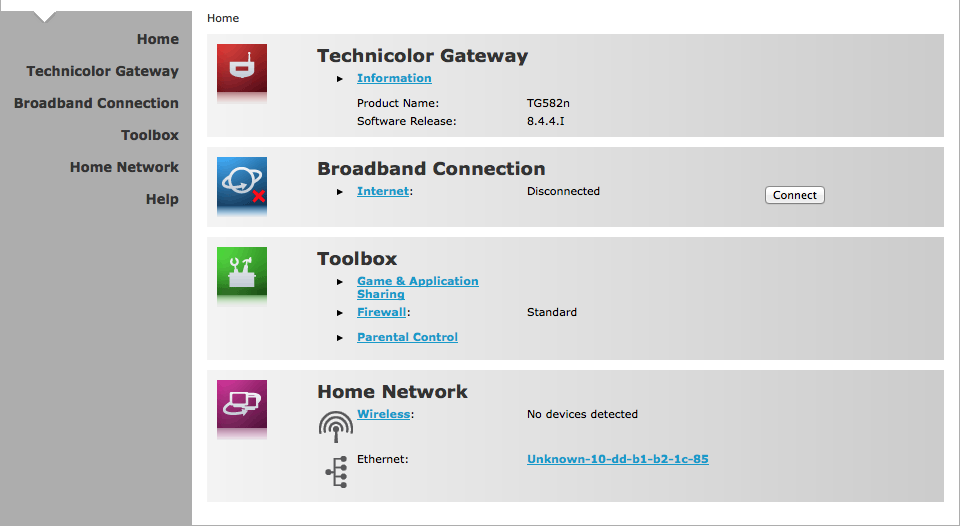
For the all-white Technicolor modem model TG582n, follow these steps:
- Open a fresh browser page;
- Go to the URL bar at the top of the webpage and enter the following IP address – 192.168.1.254. This will bring you to the modem landing page.
- Sign into the modem. The default username and password should be ‘admin’ and follow
the
steps (4 to 6) above:
TG592n Landing page:
For the all-white Technicolor Fibre To The Home modem model TG589vac v2, follow these steps:
- Open a fresh browser page;
- Go to the URL bar at the top of the webpage and enter the following IP address – 192.168.1.1. This will bring you to the modem landing page;
- Sign into the modem. The default username and password should be ‘admin’ and follow the steps (4 to 6) above;
Step 1:
- Open the internet browser
- In the address bar type 192.168.1.1
- This will take you to the modem configuration page
- Click on "Sign in" in the top right-hand corner
Step 2:
- You will be prompted for a username and password
- The username is already populated as – admin
- The password is the same – admin
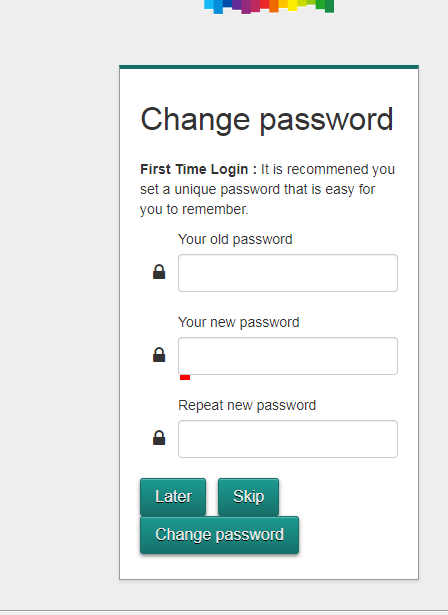
Step 3:
- You will be asked to change the password and we recommend changing this to your Wi-Fi password (which can be found on the sticker on the back of the router)
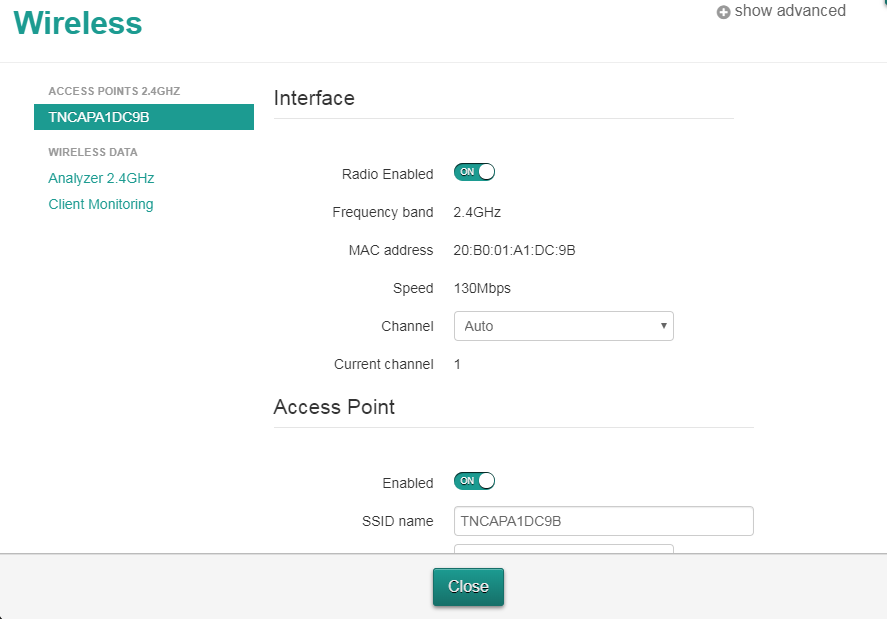
Step 4:
- You can then select wireless in the configuration menu page.
- Click on show advanced in top right-hand corner.
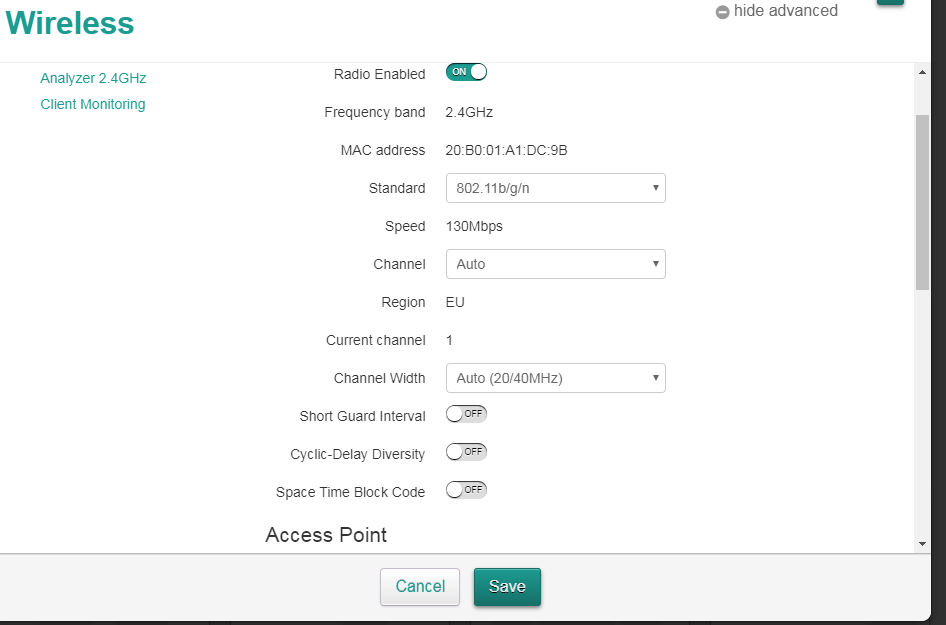
Step 5:
- Scroll down to channel width (default set to 20Mhz) change this to Auto 20/40Mhz. Click save at the bottom.
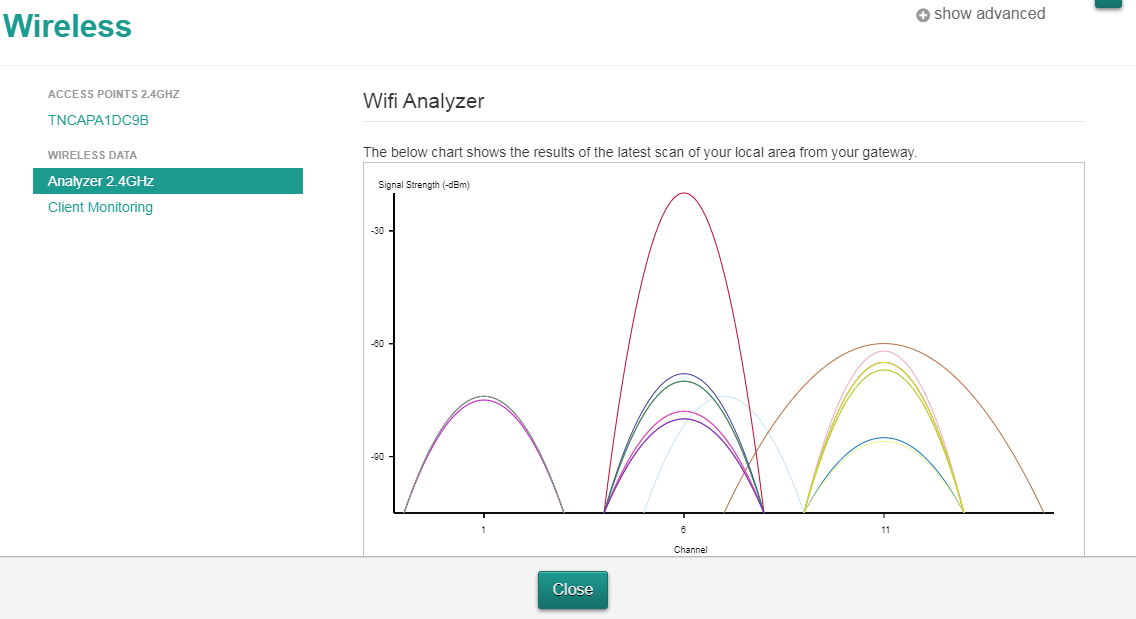
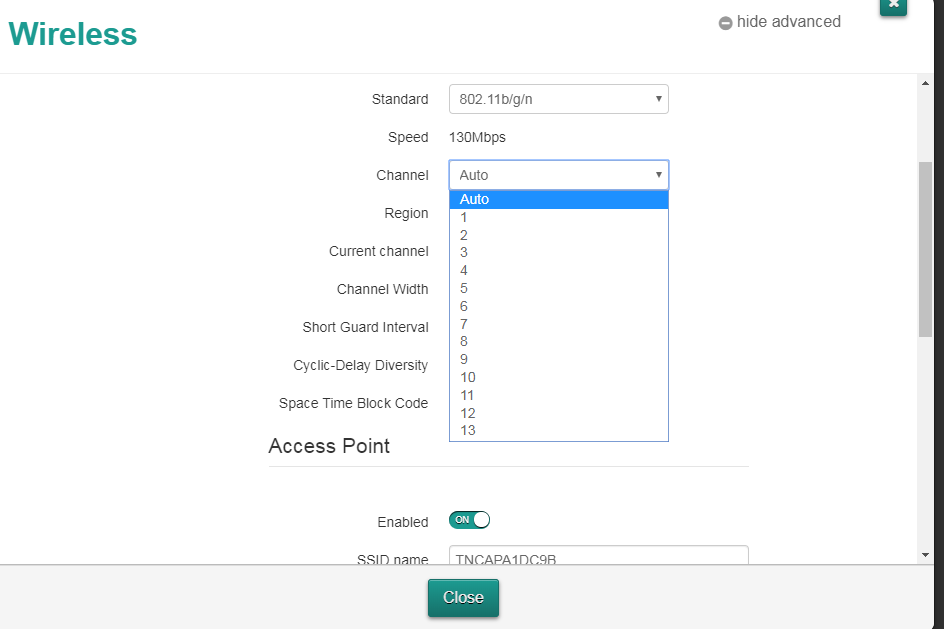
Step 6:
- If required you will be able to change the wireless channel on the same page from auto to a fixed channel between 1-11, if you click the option for “Wi-Fi analyser” in the menu on the left hand side you will be able to see the channels being used around you.
- It is best to use the channel with least people using it (i.e. with fewest or no curves), so in the example screenshot below, we would recommend selecting channel 3 or 4, where there are no curves).
Step 7:
- When you have selected your new channel, remember to click “save” at the bottom of the screen.
- Once you have completed the above steps, please close down the Technicolor page and continue to enjoy your Pure Telecom internet connection.
- We hope the above has been useful for you, however please contact us if you still need to on 01 2469000 or email us at [email protected] for further assistance.
- Check what lights are on your modem – the power, broadband, internet and wireless lights
should all be on and illuminated Green.
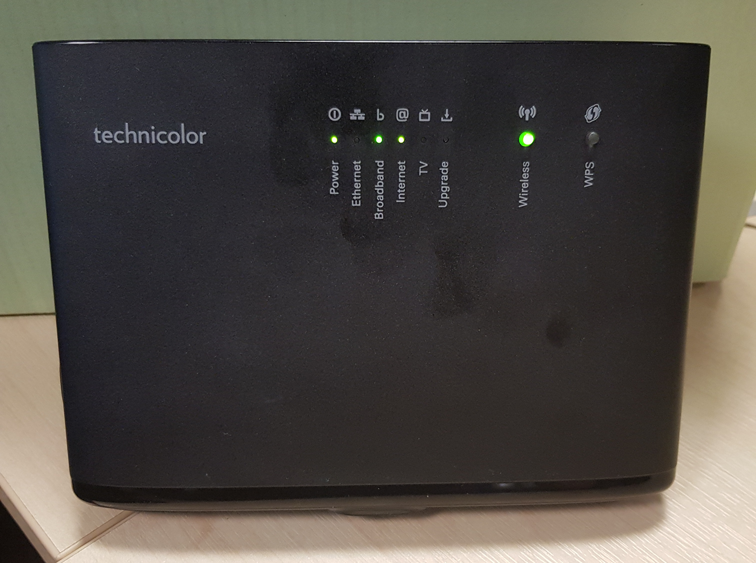
The modem shows the four lights needed for a successful connection: Power, Broadband, Internet and Wireless.
If there are only two lights on, this could indicate a cabling issue or a fault on the line when broadband isn’t working, most users will find that only the power and wireless lights are on.

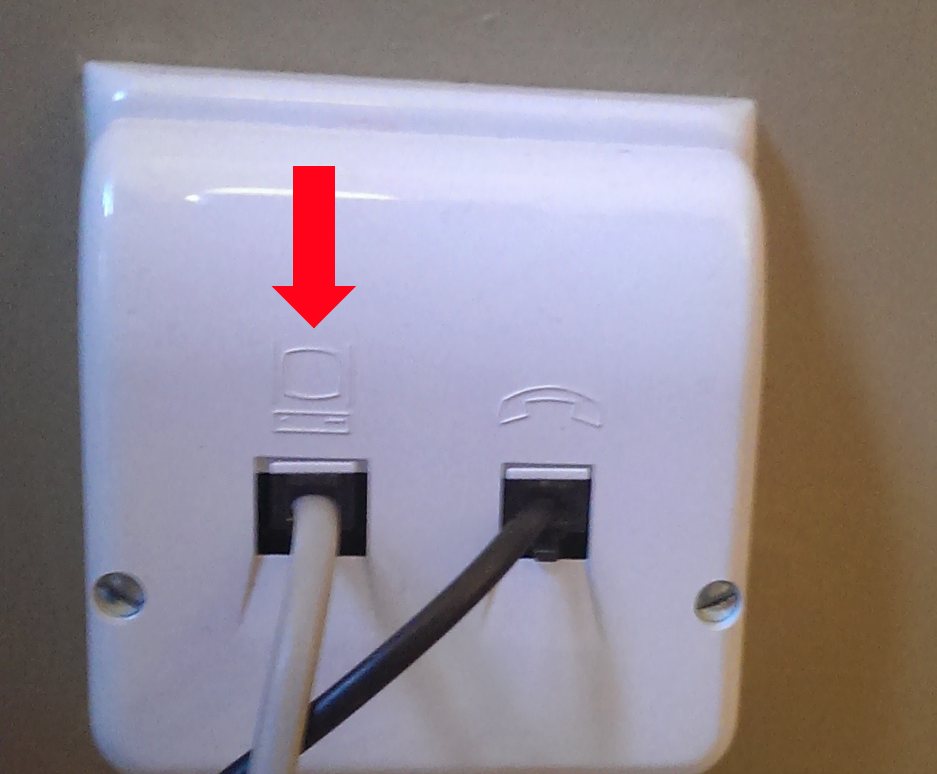
- If this is the case, check the cable going from the grey ‘DSL’ port (socket) at the back of the modem to the phone socket on the wall and make sure it is not loose. Also check that the cable is going into the correct port (socket) – it should be going into the side of the wall double socket with the computer icon.
- If you have checked this and the other lights don’t come back, contact tech support on 01-2469000.
- If your broadband light is solid but your internet light is red, or your broadband light is
solid, but your internet is not on, this could mean one of the following:
- There’s a potential fault on the line.
- Your modem needs to be configured.
- There is an account issue such as billing or authentication.
If this case, you will need to contact tech support on 01-2469000.
- Log onto www.speedtest.net or www.fast.com to perform a wired speed test – it will let you know your ping time, download speed and upload speed. All you have to do is follow the quick and easy steps onscreen;
- In order to perform the wired speed test, you will need to plug an Ethernet cable into the
laptop and
modem. Log onto the internet and run the tests ( speedtest and fast ) . This will give you
accurate speed
tests;
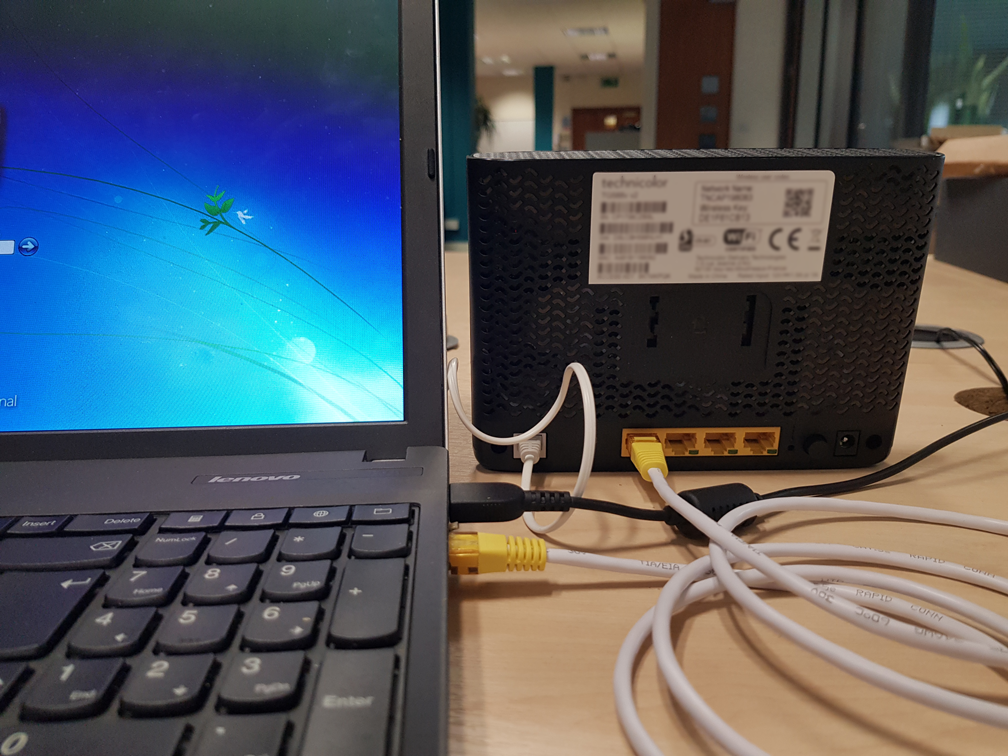
Modem attached to a computer via an ethernet cable. You should receive an ethernet cable with your modem.
If connecting via WiFi, follow the instructions below:
PS4
- Turn on the Play Station and wait for the home screen to load up.
- Scroll to and select ‘settings’ on your home screen.
- In settings:
- Select the ‘network’ option.
- Select ‘set up internet connection’.
- Select ‘use WiFi’.
- Select ‘easy’.
- Select your WiFi network.
- Choose your preferred method of text entry.
- Enter you WiFi security key and click ‘done’.
- Wait a few moments while your PS4 connects to your WiFi.
- Your PS4 is now connected.
If connecting via Wired connection (ethernet cable), follow the instructions below:
- Turn on the Play Station and wait for the home screen to load up;
- Please ensure that the ethernet cable is attached correctly to your PlayStation;
- Locate and select ‘settings’ on your home screen;
- In settings:
- Locate and select ‘network';
- Select ‘set up internet connection’;
- Select a LAN cable;
- Select ‘easy’;
- Select ‘test your internet connection’;
- Wait a few moments while your PS4 connects via an Ethernet cable;
- Your PS4 is now connected;
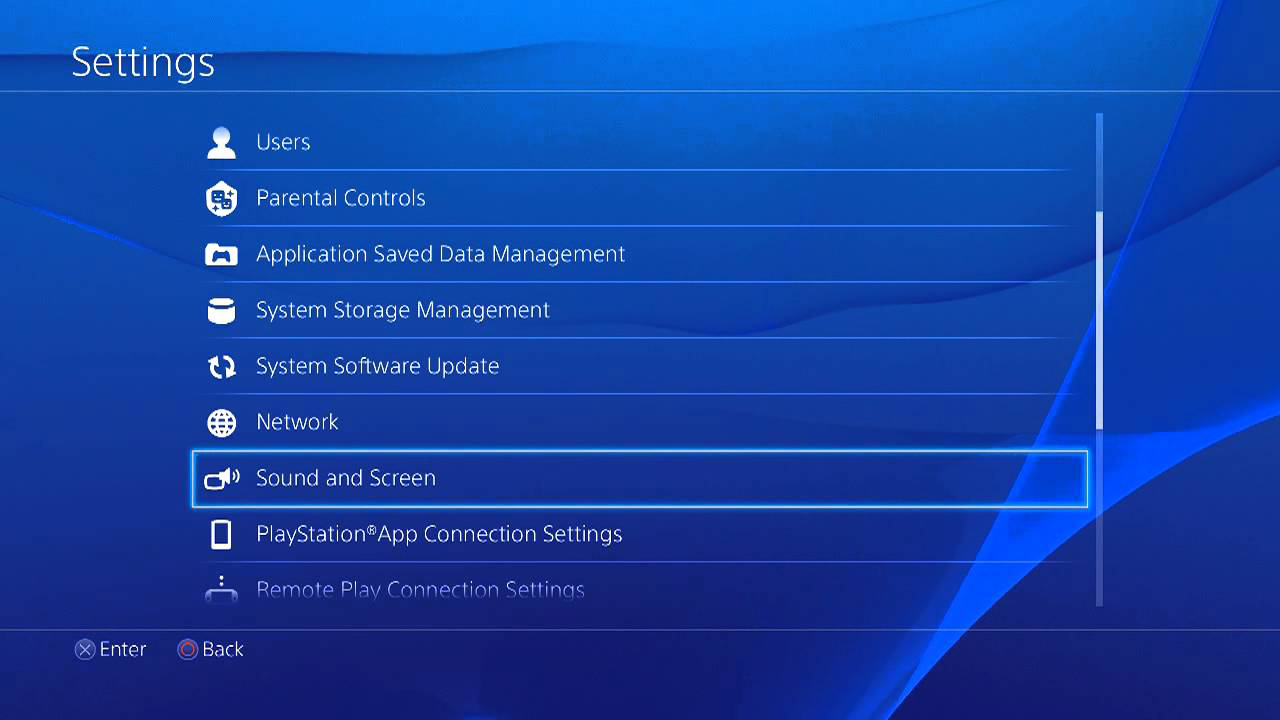
PS4 Settings Page.
Xbox ONE
- Turn on Xbox and wait for the home screen to load up.
- Press the ‘menu’ button on your Xbox controller.
- Locate and select ‘settings’ on your home screen
- In settings:
- Locate and select ‘network’.
- Select the ‘set up your wireless network’ option.
- Find and select your WiFi network.
- This option will hint at you to ‘enter a password’.
- Enter your WiFi password and click ‘enter’.
- Wait a few moments while your Xbox connects to your WiFi.
- Your Xbox is now connected.
If connecting via Wired connection (ethernet cable), follow the instructions below:
- Turn on the Xbox and wait for the home screen to load up.
- Please ensure that the ethernet cable is attached correctly to your Xbox.
- Press the ‘menu’ button on your Xbox controller.
- Locate and select ‘settings’ on your home screen.
- In settings:
- Select the ‘network’ option.
- Select ‘test network connection’.
- You should now see the status of your connection.
- Wait a few moments while your PS4 connects via an Ethernet cable.
- Your PS4 is now connected.
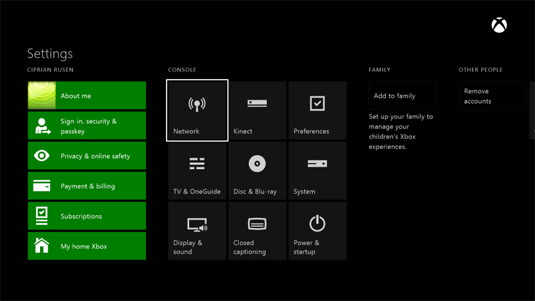
Xbox Settings Page.
Contact customer care on 01-2469000 and ask for a static IP address to be applied. This will cost €100. Please note, a static IP from a former internet service provider will not migrate when moving to a new provider.
Since I moved to Pure Telecom, I have been unable to send and receive emails on my device.
- Go to your email server settings on the device in question.
- Enter Pure Telecom’s email server settings, which are as follows:
- Outgoing Server Setting: Try smtp.puretelecom.ie or smtp2.puretelecom.ie.
- Incoming Server Setting: Dependant on ISP. Check settings with your provider.

Server settings on Outlook2016.
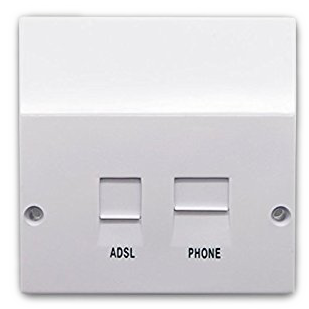
If you are about to have Fibre broadband installed for the first time, the onsite engineer/technician will need to install a faceplate that allows for both a broadband and phone connection. (There will be a phone icon beside the phone port and a computer icon for the broadband port.) The modem and phone will then plug in here. It is important to also have a power socket close by for the phone and modem to plug into.